If you loved Sketch Support then you will love Sketch Week!
Sketch Week is where I (Allison) take one sketch and show how to get multiple uses out of it. Basically, it's Sketch Support in a smaller format. Each month, during the week that SG releases a new round of downloadable sketches I take the free sketch for that month and use it as my starting point. I post three layouts throughout the week on Monday, Wednesday, and Friday. Plus, we have some past Sketch Support creative team members that are going to be joining in on the fun and creating layouts and posting them on their blogs too.
If you are missing Sketch Support come on over to my blog: www.allisonrdavis.blogspot.com and check out Sketch Week! (There are usually giveaways for downloadable classes and bundles too!)

Thursday, June 20, 2013
Tuesday, August 28, 2012
Sketch Support, the class
This month kicked off our first round of downloadables at www.scrapbookgeneration.com.
We have a variety of free sketches, single sketches, sketches with
layout samples, groups of sketches with a specific theme, and classes.
Each month, on the third Tuesday, we will add new downloads to our
online store. All downloads are new, never before published sketches and
will remain in our store indefinitely.
This month we have:
• On the Border: one double-page layout sketch (includes five 4x6 photos, two separate areas to showcase scalloped or zigzag borders) and three full-color layout samples (one summer, one Halloween, one Christmas)
• 8x10 Landscape: three double-page layout sketches by Debbie Sanders (each features a 10x8 photo and 2-4 additional photos)
• 5x7 Portrait: three double-page layout sketches by Debbie Sanders (each features one or more 5x7 photos and 3-6 additional photos)
• 5x7 Landscape: three double-page layout sketches by Debbie Sanders (each features one 7x5 photo and 4 additional photos)
• Allison Davis Class: three double-page layout sketches by Allison Davis (this set features sketches from one of Allison's sold-out Scrap-a-Palooza classes)

The non-interactive class includes over 80 pages of instructional materials and sample layouts. Originally priced at $30 and now offered for half the price ($15), the class is exactly the same minus the online interaction with me. (However, if you have any questions about anything, don't hesitate to ask either here on my blog or by emailing me at allison@scrapbookgeneration.com.)
You can read more about Sketch Support, the class by clicking here and here and can purchase the class here.
I'm really excited about all the new ways we are able to offer sketches, layout samples and classes! I'm currently working on the class for September and sometime in the future I hope to have a Sketch Support 2.
This month we have:
1 Sketch 3 Looks - 89¢
• Memorabilia Pocket:
one double-page layout sketch (includes six 4x6 photos, display pockets
for printed souvenirs and journaling blocks) and three full-color
layout samples (one travel, one school, one sports)• On the Border: one double-page layout sketch (includes five 4x6 photos, two separate areas to showcase scalloped or zigzag borders) and three full-color layout samples (one summer, one Halloween, one Christmas)
Sketch Trio - $1.29
• 8x10 Portrait: three double-page layout sketches by Debbie Sanders (each features an 8x10 photo and 3-4 additional photos)• 8x10 Landscape: three double-page layout sketches by Debbie Sanders (each features a 10x8 photo and 2-4 additional photos)
• 5x7 Portrait: three double-page layout sketches by Debbie Sanders (each features one or more 5x7 photos and 3-6 additional photos)
• 5x7 Landscape: three double-page layout sketches by Debbie Sanders (each features one 7x5 photo and 4 additional photos)
• Allison Davis Class: three double-page layout sketches by Allison Davis (this set features sketches from one of Allison's sold-out Scrap-a-Palooza classes)
Individual Sketch -- 49¢ each
•
Travel: one double-page layout sketch by Debbie Sanders (features 6
uncropped photos and one 4x4 photo, plus an oversized journaling space)
Free Sketch -- free to everyone!
•
One Page Layout: one single-page layout sketch by Allison Davis that
can be downloaded by anyone, compliments of Scrapbook Generation
Class -- $15
•
Sketch Support: My popular online class that I taught at My Creative
Classroom is being offered in PDF form through Scrapbook Generation.
The non-interactive class includes over 80 pages of instructional materials and sample layouts. Originally priced at $30 and now offered for half the price ($15), the class is exactly the same minus the online interaction with me. (However, if you have any questions about anything, don't hesitate to ask either here on my blog or by emailing me at allison@scrapbookgeneration.com.)
You can read more about Sketch Support, the class by clicking here and here and can purchase the class here.
I'm really excited about all the new ways we are able to offer sketches, layout samples and classes! I'm currently working on the class for September and sometime in the future I hope to have a Sketch Support 2.
Sunday, May 27, 2012
Taking a Break
••••••••••••••••••
Sketch Support will be taking a break for an unknown amount of time. There will not be any new sketches or layouts posted during this break.
We knew when starting up Sketch Support that there was going to be a lot of work involved. We never expected it to be easy and knew that it was going to take time and effort. We are taking the time right now to decide if that time and effort we put into this site is worth it. It was a difficult decision to make but it was time to evaluate things and see where we stand.
I wish I could give you a specific date of when things might start up again but at this time I do not know.
Thank you for understanding.
Friday, May 25, 2012
One-page Week, Part 5 - Nikki Sivils, Scrapbooker Product Challenge
•••••••••••••••••••••••
.jpg)
You can download and print this sketch by clicking on the one-page sketches link found under the "printable sketches" tab on the right sidebar.
It is time again for our Nikki Sivils, Scrapbooker Product Challenge!
In case you missed the product challenge details, Nikki Sivils provided a collection kit to each member of our Creative Team. Each had the choice between the four newest collections - Noah, Audrey, Exit Here, and Messages. Together with the May sketches we will show you how using the same products and even the same sketches can produce so many different results.
They are also featuring our sketches this month on the Nikki Sivils, Scrapbooker blog! You'll definitely want to go check out how their talented team used the sketches from our two newest books!
Since it is One-page Week, all of the projects posted today for the product challenge are based on the May one-page sketch.
Messages Collection

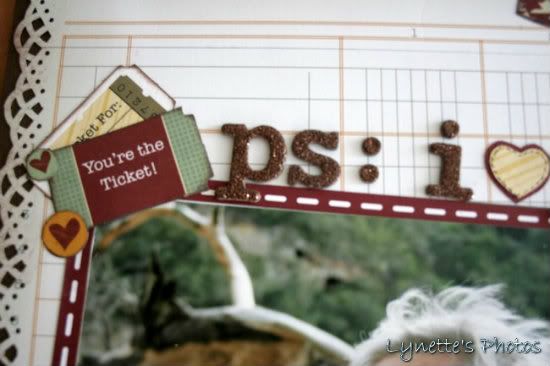
"PS: I Love You" by Lynette Jacobs
Supply list - Cardstock: Bazzill; Printed papers and embellishments: Nikki Sivils (Messages); Punches: Martha Stewart; Letter Stickers: American Craft (thickers); Other: twine and buttons
Variation #1: I die-cut the background ledger paper and pasted it onto Bazzill.
Variation #2: I die-cut all my strips to form layers.
Variation #3: I added buttons to my flags.
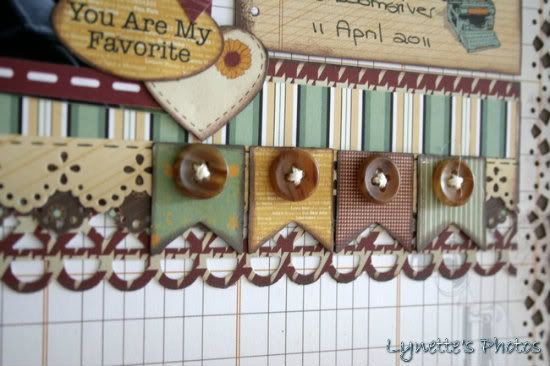
Variation #4: I punched hearts for the banner.
• • • • • • • • • • • • • • • • • • • • • • • • • • • • • •
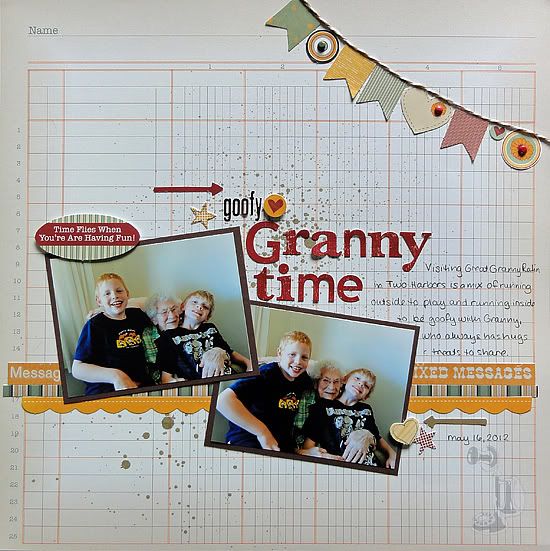
"Goofy Granny Time" by Jennifer Larson
Supply List - Patterned Paper and Die Cuts: Nikki Sivils; Letter Stickers: Lily Bee Design and October Afternoon; Baker's Twine: The Twinery; Pen: Zig; Brads: Craft Supply; Mist: Studio Calico
Variation #1 - I used horizontal photos instead of vertical; because it took more room, I eliminated the lower banner.
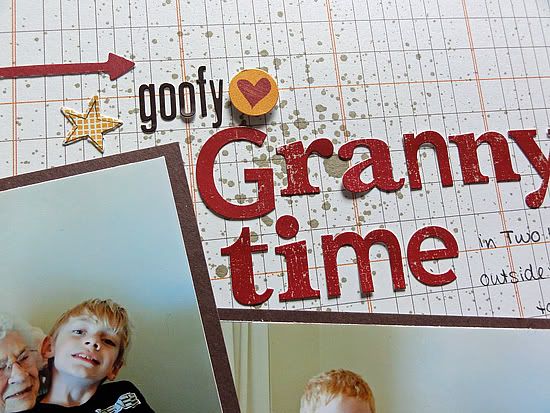
Variation #2 - To add greater dimension to the die cuts, I adhered several with dimensional stickers.
• • • • • • • • • • • • • • • • • • • • • • • • • • • • • •
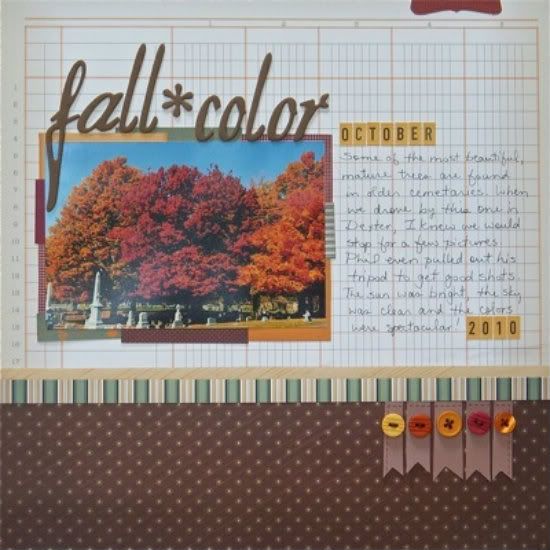
“Fall Color” by Sue Althouse
Supplies - All my supplies are from the Nikki Sivils Messages collection, except the following: Alphabets: American Crafts Thickers, October Afternoon Mini Market Stickers; Ribbon/Twine: We Are Memory Keepers floss; Other: miscellaneous buttons
One of the reasons I chose the Messages collection was the rich colors that remind me of my favorite season, autumn. I knew I would be doing some kind of fall project and here it is!
Variation #1 - Used one 6x4 photo and added layered matting.

Variation #2 - Ran the strips all the way across the page and omitted the sewing.
Variation #3 - Added patterned paper to the bottom of the page.
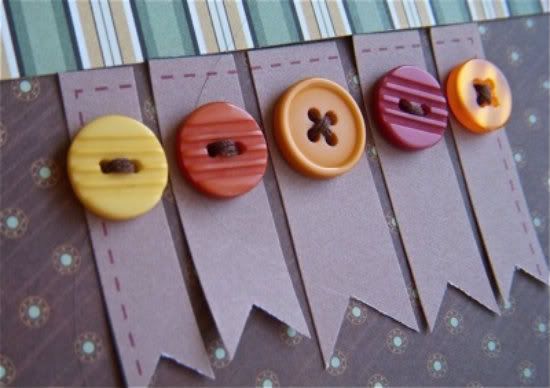
Variation #4 - Added buttons to the banners.
Variation #5 - Omitted the butterfly embellishments.
Variation #6 - Changed the banner in the upper right corner to a smaller tab.
• • • • • • • • • • • • • • • • • • • • • • • • • • • • • •
Audrey Collection
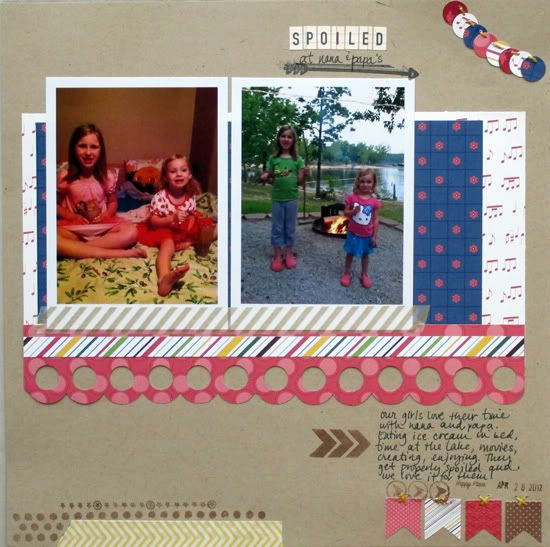
"Spoiled at Nana and Papa's" by Christy Arthur
Supply List - Patterned Paper: Nikki Sivils (Audrey's Tablecloth, Audrey's Planner, Audrey Meets Harlo, Audrey's Showercap, Audrey's Handbag); Embellishments: Nikki Sivils (Audrey Die Cut), October Afternoon (Mini Market Ledger), Love My Tapes Washi (Gold Airmail), Bella Blvd Washi (Yellow Chevron); Stamps: My Minds Eye (Happy Days and Everyday Fun), 7 Gypsies (Par Avion); Tools: EK Success Circle Border Punch
Variation #1: I added some additional patterned paper behind the photos.
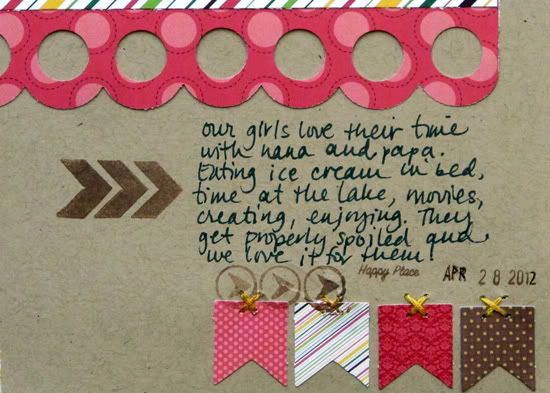
Variation #2: I added some embellishments and stamps along the bottom of the layout.
Variation #3: I made a small garland in the right corner using my the circle border punch.
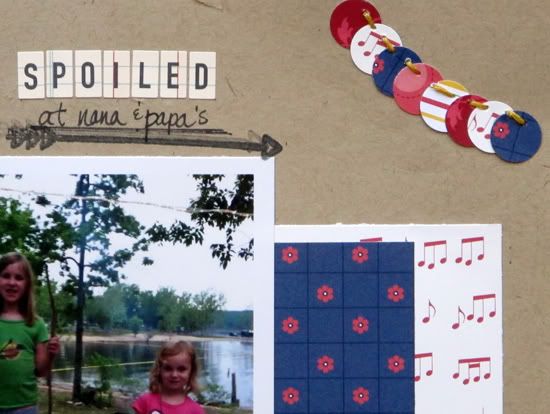
Variation #4: My two photographs are lined up straight across instead of offset like the sketch.
• • • • • • • • • • • • • • • • • • • • • • • • • • • • • •
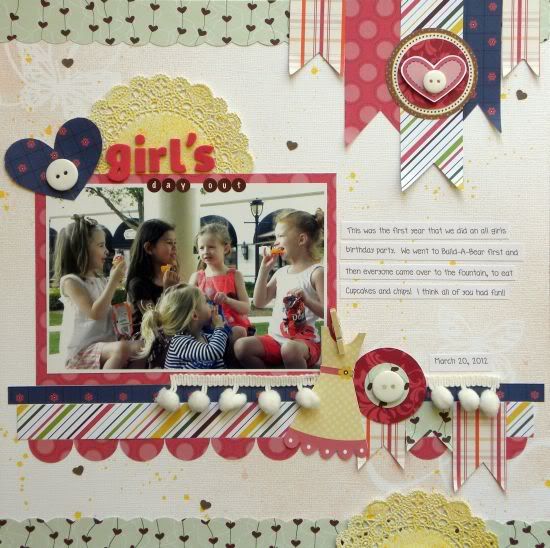
"Girl's Day Out" by Ashley Horton
Supply List - Cardstock: Bazzill; Patterned Paper and Stickers: Nikki Sivils; Spray Mist: Smooch Spritz and October Afternoon; Thickers: American Crafts; Font: CK Girl; Punch: Anna Griffin; Doilies: Hobby Lobby; Pom Pom Trim: Wright's; Buttons: Michael's; Edgers: Provo Craft; Mini Clothes Pin: Canvas Corp; Punch: Marvy
Variation #1 - I used one 4x6 photo, in place of the the two 3x4 photos.
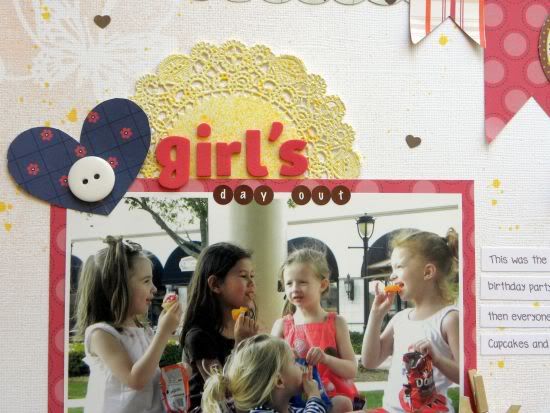
Variation #2 - I added border strips at the top and bottom of the page, along with a doily embellishment.
Variation #3 - I used a pennant banner, in place of the scalloped banner at the top of the page.

• • • • • • • • • • • • • • • • • • • • • • • • • • • • • •
Exit Here Collection
••••••••••••••
••••••••••••••
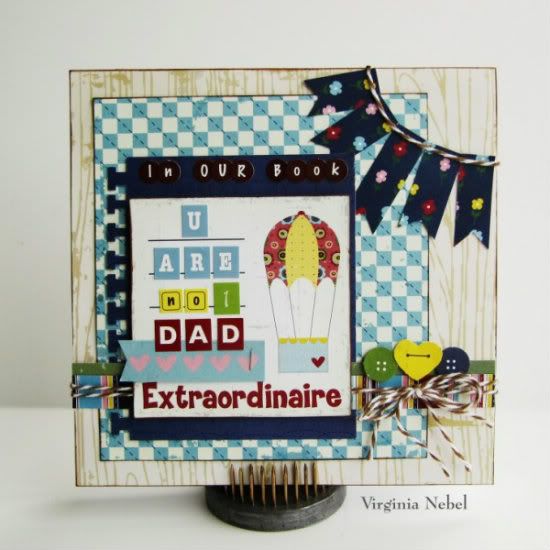
"In Our Book, U are No. 1 DAD Extraordinaire" by Virginia Nebel
Supply list - Patterned paper: Nikki Sivils; Embellishments: The Twinery
Variation #1 - Instead of a 12 x 12 page I created a square card. I used one large element in the middle to mimic a book cover. I used different alphas to create the long message sentiment.
Variation #2 - Substituted button die-cuts and twine for the banners along the bottom.
• • • • • • • • • • • • • • • • • • • • • • • • • • • • • •
Noah Collection
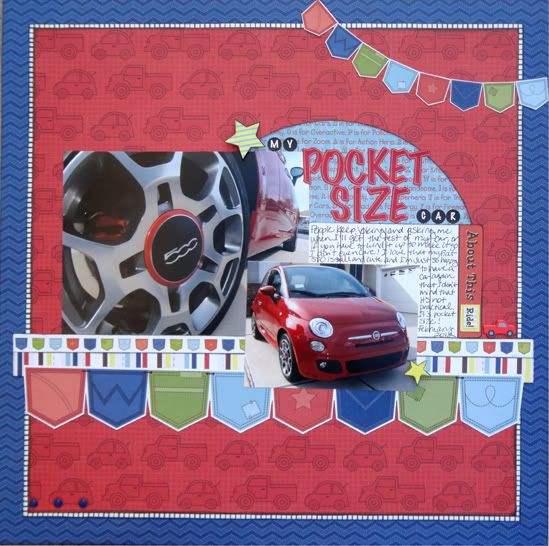
“My Pocket Size Car” by Andrea Friebus
Supply list – Patterned paper, stickers, die cuts: Nikki Sivils (Noah collection); ink: Clearsnap; brads: Making Memories
Variation #1 - My photos are different sizes than the ones in the sketch—mine are 5.5”x4” and 3.5”x2.5”. I’m not a fan of tilting my photos so I kept them straight and did not mat them.
Variation #2 - I added two more background patterned papers for color, and I liked how they helped create the look of a frame for the layout.
Variation #3 - The red title stickers didn’t show up well against the red background so I included a circle of paper in a contrasting color to place the title on.
Variation #4 - Instead of banner pieces along the bottom, I used the pockets cut from the patterned paper and extended them across the page.
Variation #5 - Rather than using butterflies as embellishments, I used stars and added some brads.
• • • • • • • • • • • • • • • • • • • • • • • • • • • • • •
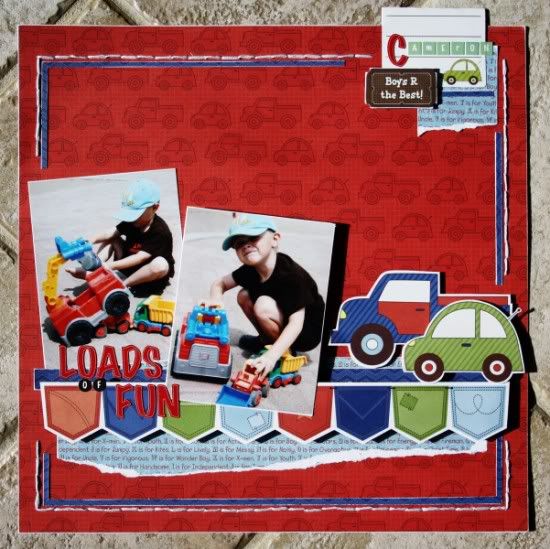
"Loads of Fun" by Janette Kincaid
Supplies - Patterned paper, cut outs, die cut, alphas: Nikki Sivils, Scrapbooker; Floss: DMC; Adhesive: Glue Arts, Helmar; Unknown: foamcore, sanding block
I don’t have little boys of my own, so when I’m looking to create ‘boy’ pages I look through photos I’ve got of my nephews. These ones of Cameron playing trucks at the park were perfect for the Noah line from Nikki Sivils.
Variation #1 - I replaced the banner trim in the sketch with the pocket banner from the cut out sheet in the collection. I raised this up on foam core to add depth.
Variation #2 – I removed the journal area and replaced it with a truck and car cut from the same sheet as above.
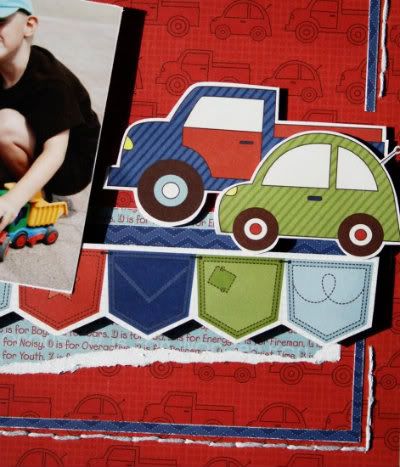
Variation #3 – I relocated the title to the bottom left.
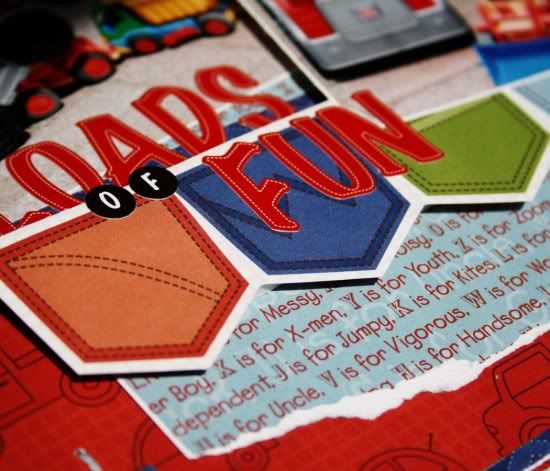
Variation #4 – Rather than adding the second banner at the top of the layout I added an embellishment cluster including a journal box, a die cut ticket and scraps of patterned paper.
Variation #5 – I added a border of stitching and patterned paper to hold my layout together and help ‘ground’ it.
• • • • • • • • • • • • • • • • • • • • • • • • • • • • • •
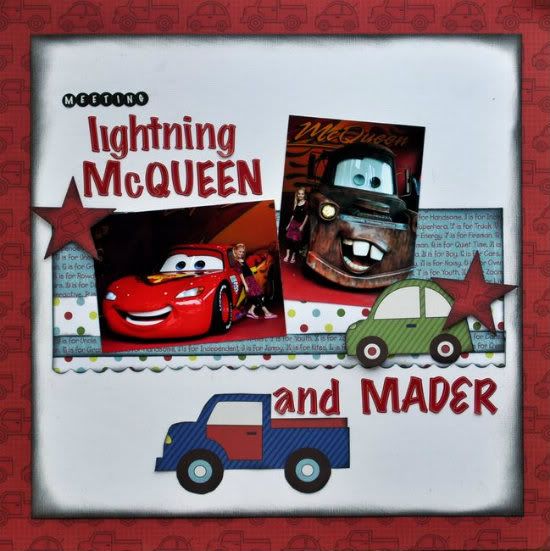
"Meeting Lightning McQueen and Mader" by Jill Sarginson
Supplies Used - Patterned Paper: Nikki Sivils (Noah paper collection); Alpha: Nikki Sivils (Noah collection); Ink: Vibrance; Cardstock: Bazzill Basics; Tools: Creative Memories star punch, Fiskars scallop border punch
Variations:
• I used a horizontal photo and vertical vs. two vertical photos.
• I did not include the banner.
• I added two vehicles as embellishments
••••••••••••••••••••
Thursday, May 24, 2012
One-page Week, Part 4
•••••••••••••••••••••••
You can download and print this sketch by clicking on the one-page sketches link found under the "printable sketches" tab on the right sidebar.
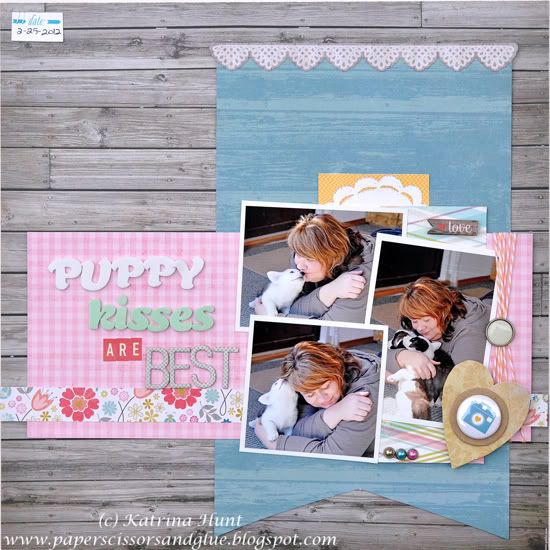
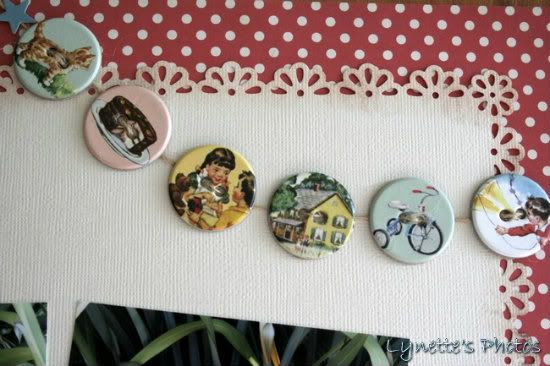
"Puppy Kisses Are Best" by Katrina Hunt
Supplies - Patterned Paper: My Mind’s Eye (Dolled Up Collection); Die Cuts and Stickers: My Mind’s Eye (Dolled Up Collection); Cardboard and Chipboard: Basically Bare; Flair: A Flair for Buttons Etsy shop; Adhesives: Scotch, Fabri-Tac and Scrapbook Adhesives; Tags: Elle’s Studio; Twine: The Twinery; Brads: My Mind’s Eye (Dolled Up); Lettering for Title: American Crafts and October Afternoon
Variation 1 - Moved the pictures over.
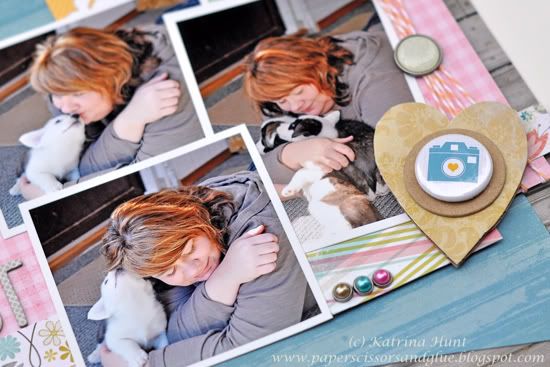
Variation 2 - Made one big banner piece and extended it up further.
Variation 3 - No journaling, I inserted my title where the journaling should have been.

Variation 4 - Added a bigger layer and an additional layer going up the one banner piece.
• • • • • • • • • • • • • • • • • • • • • • • • • • • • • •
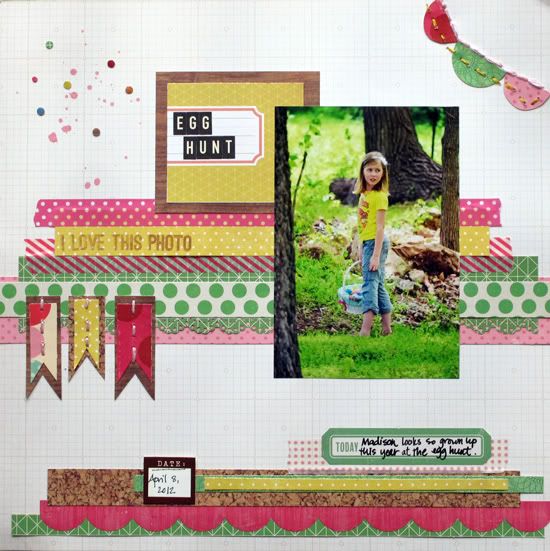
"Egg Hunt" by Christy Arthur
Supply List - Patterned Paper: Crate Paper (Paper Heart Delivery, Pretty Party Streamers, Story Teller Archives, Journey, Peppermint Ski Lodge), Studio Calico (Classic Calico Folio, Autumn Press Frolic), October Afternoon (Sidewalks Marbles); Embellishments: Crate Paper (Pretty Party Border Stickers, Story Teller Phrase Stickers), Studio Calico (Mister Huey Piglet, Stamps), October Afternoon (Mini Market Stickers Black and Cream), Love my tapes (White Dots on Pink), Martha Stewart (Doily Punch), Elle's Studio (Lil' Snippets Date)
Variation #1: I used one photo instead of the two shown in the sketch.
Variation #2: I flipped the locations of the photo and the banner, leaving the garland and title in the same place as the sketch.
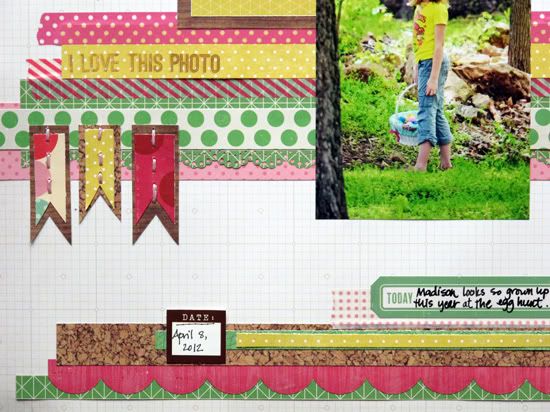
Variation #3: I stacked two banners on top of each other and stitched them down the middle.
Variation #4: I added some additional strips of paper and tape behind the photo and along the lower part of the layout.
Variation #5: I added some drops of mist and little pieces of confetti in the top, left corner of the layout.
• • • • • • • • • • • • • • • • • • • • • • • • • • • • • •

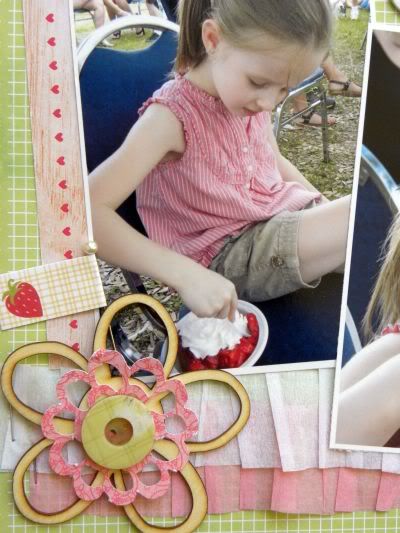
"Berry Good" by Ashley Horton
Supply List - Patterned Paper, Ruffled Paper, and Thickers: American Crafts; Spray Mist: Smooch Spritz and October Afternoon; 6x6 Template: The Crafter's Workshop; Baker's Twine: The Twinery; Brads: Bazzill; Flag: Bella Blvd.; Wood Flourishes: Kaisercraft; Punch: Marvy; Other: Buttons and Staples
Variation #1 - My photos are sized to 3.5x5, instead of 3x4.
Variation #2 - I added a large die cut flower, in place of the half banner at the top right hand side of the page.
Variation #3 - My title is located further to the top of the page, since my photos are a little larger than the size on the sketch.
Variation #4 - I used ruffled paper across my page for the border strips and added a fussy cut jar embellishment next to the journaling area.
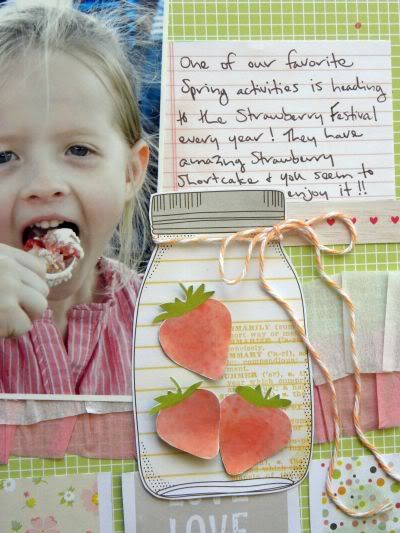
Variation #5 - I added an embellishment cluster to the bottom corner of the photo on the left hand side of the page.
Wednesday, May 23, 2012
One-page Week, Part 3
•••••••••••••••••••••••
You can download and print this sketch by clicking on the one-page sketches link found under the "printable sketches" tab on the right sidebar.

"Happy" by Lynette Jacobs
Supply list - Cardstock: Bazzill; Printed papers: Cosmo Cricket, October Afternoon; Stickers: October Afternoon: Chipboard buttons: October Afternoon; Buttons: Basic Grey; Flowers: Prima; Brads: My Minds Eye
Variation #1: I die cut the Bazzill and pasted it over the dotty paper.
Variation #2: I made the banner from chipboard buttons.
Variation #3: I substituted the butterflies for flowers.
Variation #4: I made the flags the title.
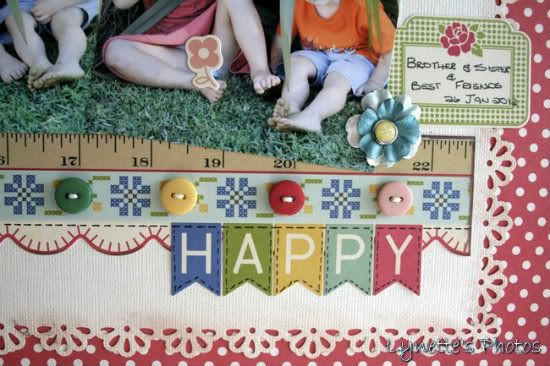
Variation #5: I used two 4x4 photos.
• • • • • • • • • • • • • • • • • • • • • • • • • • • • • •
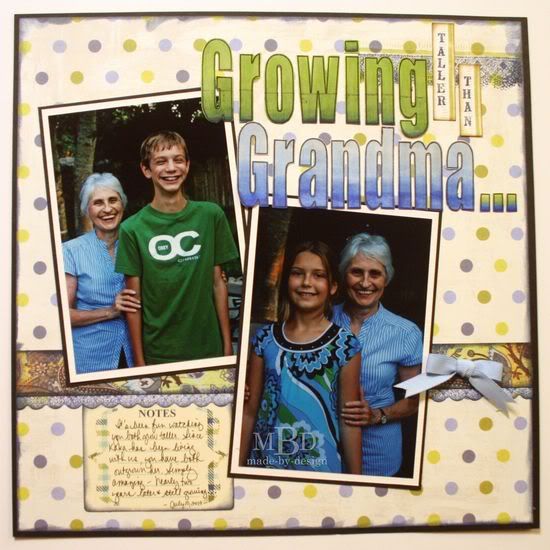
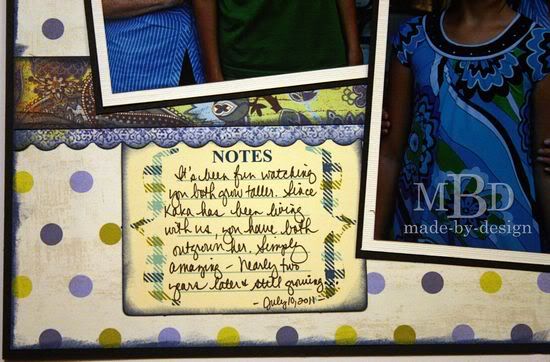
"Growing Taller Than Grandma." by Megan Bickers
Supplies Used - Cardstock: Georgia Pacific (White), Bazzill (Cream), Maple Press (Black); Patterned Paper: Basic Grey (Skate Shoppe: Indy Grab), My Mind's Eye (Wild Asparagus Blue/Green Polka Dot; Front Porch); Inks: Tsukineko (Memento: Tuxedo Black), Ranger (Distress Inkpad: Shabby Shutters, Walnut Stain, Chipped Sapphire); Stamps: Maya Road (Measure Twice Singleton), The Girls Paperie (Paper Girl), Jenni Bowlin (Lace Border), Technique Tuesday (Big Timber Alphabet), Hampton Art (Tiny Wooden Alphabet); Tools: Ranger (Foam Blending Tool); Markers: EK Success (Zig Writer: Black), Copic (B21, B24, B29, YG03, YG63, YG67, W3); Embellishments: Close To My Heart (Ribbon: Heavenly Blue), October Afternoon (Journaling Card: Detours)
Variation #1: I used larger photos by adding two 4x6" photos plus cream and black mats. This helped my photos stand out more on the page.
Variation #2: I matted my background pattern paper on a black cardstock and extended my pattern paper border to the edges along the bottom of the photos.
Variation #3: Instead of making the banner and pendant, I used a ribbon bow and stamped some lace and a ruler edge along the top of my layout.
Variation #4: I added my journaling on a journaling card and moved it to the bottom left of my layout. The title was stamped and I colored the main letters with Copic markers to match.

Tuesday, May 22, 2012
One-page Week, Part 2
•••••••••••••••••••••••
You can download and print this sketch by clicking on the one-page sketches link found under the "printable sketches" tab on the right sidebar.
• The sketch isn't uploaded to print at this time. The hosting site we use is having some server problems. It will be available to print as soon as possible. Thank you for your patience.
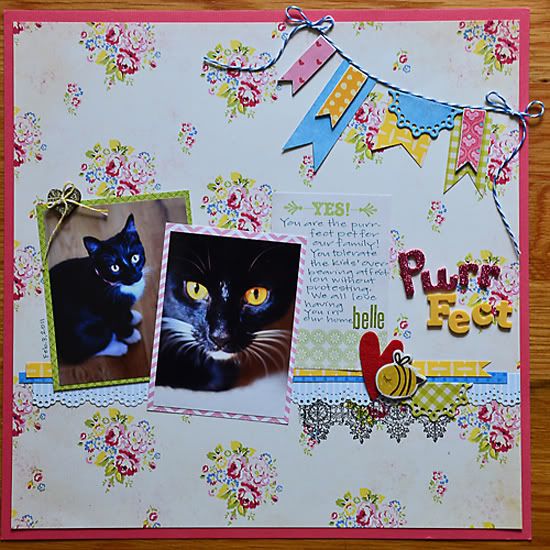
"PurrFect" by Suzanna Lee
Supply List - Cardstock: Bazzill Basics; Patterned paper: The Girls Paperie, My Minds Eye, October Afternoon, Ruby Rocket, 3 Bugs in a Rug, Cosmo Cricket, Bella Boulevard; Chipboard: Jenni Bowlin, Crate Paper; Twine: The Twinery; Felt: Fundamentals; Wood Button and Stamp: Prima; Punch and Pen: Martha Stewart; Letter Stickers: American Crafts, Lily Bee; Ink: VersaMark; Die: Lifestyle Crafts; Journal Spot: K&Co
Variation 1: My title is in a different location in order to create movement across the page.
Variation 2: Instead of the banners below the horizontal strip, I used a lace stamp that had the same appearance of the banners.
Variation 3: I never like writing directly on my backgrounds, it never works for me. I used a journal spot instead.
Variation 4: Rather than semi-circles for the top corner banner, I used a variety of shapes, sizes and "density" (chipboard and layered pieces)
• • • • • • • • • • • • • • • • • • • • • • • • • • • • • •
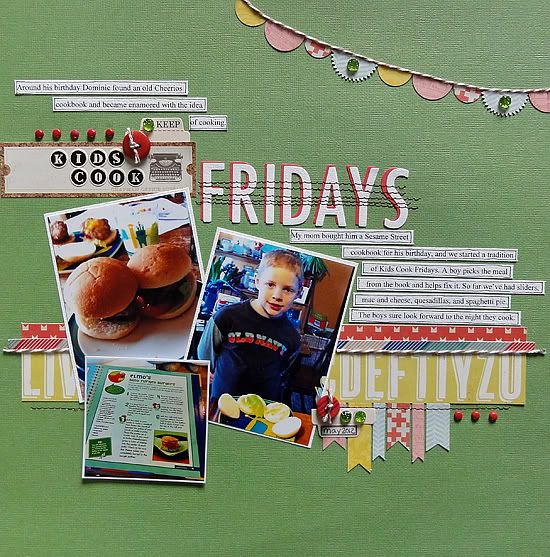
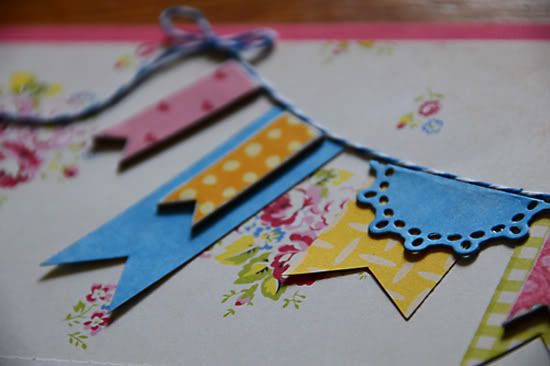
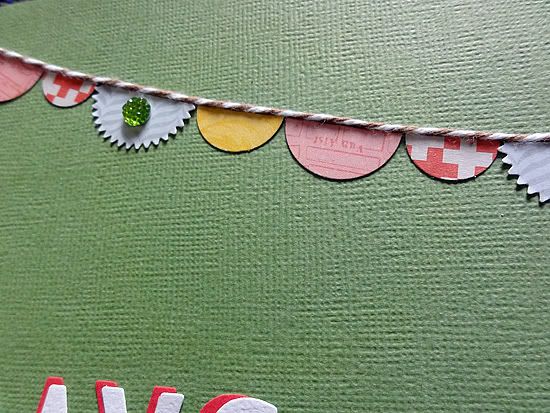
"Kids Cook Fridays" by Jennifer Larson
Supply List - Cardstock: Bazzill; Patterned Paper: Crate Paper, American Crafts, Echo Park; Punches: EK Success, Martha Stewart; Baker's Twine: The Twinery; Stickers: Crate Paper, Jenni Bowlin; Gems: Queen & Co.; Buttons: October Afternoon; Dies: Quickutz; Font: Times New Roman
Variation #1 - I kept the sketch almost exactly as it was, just adding some zigzag circles in addition to the round on the banner and adding a photo below. I also added more "stuff" around the title.

• • • • • • • • • • • • • • • • • • • • • • • • • • • • • •

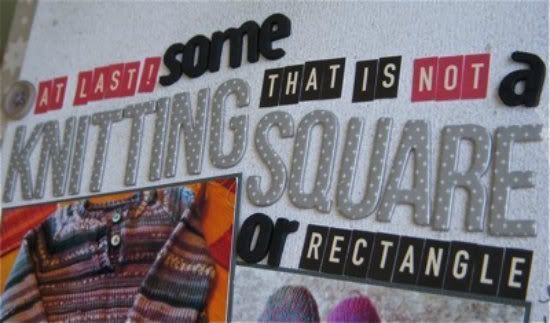
“At Last! Some Knitting That Is Not A Square or Rectangle” by Sue Althouse
Supplies - Cardstock: Bazzill, American Crafts; Patterned Paper, Tags, Flowers, Buttons: American Crafts (Chap); Alphabet: American Crafts Thickers, October Afternoon Mini Market Stickers; Inks, Mists: Studio Calico Mister Huey's Clay Mist, Creative Memories Black Chalking Ink; Ribbon/Twine: We Are Memory Keepers Sew Easy floss
I love long titles and had great fun with this one. I also love scrapping about my other favorite hobby!
Variation #1 - Rotated the orientation of the photos.
Variation #2 - Added a third paper strip.
Variation #3 - Ran the strips all the way across the page.
Variation #4 - Used a smaller banner, and buttons instead of butterflies.
Variation #5 - Added a patterned paper border to the page.
Subscribe to:
Posts (Atom)